Completely Homemade Pumpkin Pie
My family knows how to cook. So this year for Thanksgiving I decided to see of I could keep up. Here's the steps and recipe for a completely and entirely homemade pumpkin pie including the crust and home baked pumpkin. Happy baking!
Preparing the Pumpkin
A small 8 inch sweet pumpkin is recommended, but not your only option. Jack-o-lantern pumpkins can be used (just strain once pureed and add 25% more sugar later). In my case, Food City did not have any pumpkins left when I went shopping and since there was no chance I was driving to another grocery store, I used a butternut squash. It has the same consistency and color and tastes almost exactly the same as pumpkin.
Begin by preheating the over to 350 degrees. Then wash your pumpkin (or squash) and slice it in half. After slicing remove the seed and strings. I found that an ice cream scoop worked perfectly for this step.
 After your gourd is scooped, fill a large casserole dish with 1/2 cup of water, a TBS of honey and 1 tsp of vanilla extract. You don't HAVE to add flavoring to the water, but I think it adds a little something while the pumpkin is baking. Next add your sliced pumpkin cut side down to the casserole dish. Cover the dish with aluminum foil and bake for 45 minutes or until the pumpkin is tender. You can check for tenderness with a fork.

Once your pumpkin is nice and tender, remove it from the oven and let it cool for at least 15 minutes. Scoop out the flesh of the pumpkin and place it in a medium sized mixing bowl. It's much easier to scoop the pumpkin than I thought it'd be, so be careful not to get any of the peeling in your bowl. Next, puree the pumpkin to a creamy, smooth consistency. I used a hand mixer to puree my squash. You can also use a hand blender or food processor.


Homemade Pie Crust (The best part!)
 Cut the butter into cubes and put it in the freezer. You should actually do this the night before you are making your pie, but at the very least, 15 minutes in the freezer will do. The crust will be much flakier if the butter is cold, so freeze your butter!


Preheat your oven to 425 F.
Add your dry ingredients to your food processor and pulse to mix. Next add your magic frozen butter cubes. Pulse the butter six or eight times until the mixture starts to look like corn meal. Add ice water 1 TBS at a time, pulsing until mixture begins to clump together. It should look sorta like wet sand. You can tell the dough is ready if it starts to stick together when you pinch it. If not, add more water and keep pulsing.

 Once your dough looks like perfectly wet sand, roll it into two round discs. Wrap the disks in plastic wrap and stick them in the fridge for half an hour. This makes the dough easier to work with later.
 After the dough is chilled, lightly flour your rolling surface, hands, and rolling pin. Flatten the disks as much as you can with yours hands. Use the rolling pin to make the dough into 1/4 inch thick sheet that somewhat resembles a circle as best you can. This part is kinda tricky. As you can see, my circle looks more like a weird sunflower.
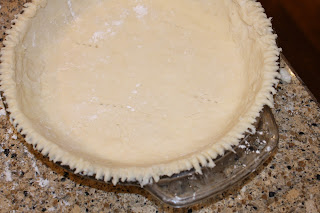 This next feat is kinda tough, too. You have to pick up your sheet of dough (without breaking it) and place it in your pie dish. Making sure that your rolling surface is floured well helps out a lot. Just be patient and move slowly. Once your crust has made it to the dish, cut off the excess and press the edges with a fork. I tried being fancier with the crust edges, but I gave up.
Baking Your Delicious Pie

Roll out and place your remaining dough disk into a second pie dish. Now it's time to remember where you put your pumpkin pie filling surprise. Take the filling and carefully pour half of it into each pie shell. Pour slowly. No one likes spilled pumpkin juice surprise.

 Carefully place both pies into your preheated 425 F oven for 15 minutes. After the first 15 minutes, set the oven temperature down to 350 F and bake for another 45-60 minutes. They're done when a butter knife stuck in them comes out clean.
 While your pie is baking, do the dishes. There'll be quite a few of them...
I wish I had a magic kitchen fairy that would follow behind me and keep everything washed, dried, and put away. Maybe one day...


 ...I let my uncle Shawn be the taste tester. He said the crust was very good, he liked the texture and that fact that it didn't taste too pumpkin-ie. We both decided it would be a good idea to skip the ginger next time, though.


 After your gourd is scooped, fill a large casserole dish with 1/2 cup of water, a TBS of honey and 1 tsp of vanilla extract. You don't HAVE to add flavoring to the water, but I think it adds a little something while the pumpkin is baking. Next add your sliced pumpkin cut side down to the casserole dish. Cover the dish with aluminum foil and bake for 45 minutes or until the pumpkin is tender. You can check for tenderness with a fork.
Once your pumpkin is nice and tender, remove it from the oven and let it cool for at least 15 minutes. Scoop out the flesh of the pumpkin and place it in a medium sized mixing bowl. It's much easier to scoop the pumpkin than I thought it'd be, so be careful not to get any of the peeling in your bowl. Next, puree the pumpkin to a creamy, smooth consistency. I used a hand mixer to puree my squash. You can also use a hand blender or food processor.

Mixing Pie Contents
- 1 cup sugar (or 3/4 cup honey)
- 2 tsp cinnamon
- 1 tsp ground cloves
- 1 tsp ground allspice
- 1/2 tsp ground ginger (Next time I'm not using any ginger. Didn't like the taste.)
- 1/2 tsp salt
- 4 large eggs
- Your nicely pureed pumpkin (approx. 3 cups)
- 1 1/2 cans evaporated milk (12 oz. can)
- 1/2 tsp vanilla extract
 |
| I always get evaporated milk and sweetened condensed milk mixed up. This pie call for evaporated. |


 |
| Not many Mamaws send their granddaughters home grown chicken eggs in a cheetah gift bag. I love that woman. |
This next part is simple. Dump all the ingredients into a mixing bowl and beat with a hand mixer until it it is smooth and well mixed. It will look extremely "liquidy", but I promise your pumpkin pie will firm up in the oven. You are now ready to pour your pumpkin mixture into your crust. You COULD go buy a Pillsbury pie crust at the store, but that's no fun. Make your own! If I can, then you can too. Making pie crust is not nearly as difficult as my momma said it would be when I told her my plan of baking a truly homemade pumpkin pie.


Homemade Pie Crust (The best part!)
- 2 1/2 cups all purpose flour, plus some for rolling
- 2 sticks of unsalted butter (8 oz. total)
- 1 tsp salt
- 1 tsp sugar
- 6 to 8 TBS ice water


Preheat your oven to 425 F.
Add your dry ingredients to your food processor and pulse to mix. Next add your magic frozen butter cubes. Pulse the butter six or eight times until the mixture starts to look like corn meal. Add ice water 1 TBS at a time, pulsing until mixture begins to clump together. It should look sorta like wet sand. You can tell the dough is ready if it starts to stick together when you pinch it. If not, add more water and keep pulsing.

 Once your dough looks like perfectly wet sand, roll it into two round discs. Wrap the disks in plastic wrap and stick them in the fridge for half an hour. This makes the dough easier to work with later.

Baking Your Delicious Pie


Roll out and place your remaining dough disk into a second pie dish. Now it's time to remember where you put your pumpkin pie filling surprise. Take the filling and carefully pour half of it into each pie shell. Pour slowly. No one likes spilled pumpkin juice surprise.

 Carefully place both pies into your preheated 425 F oven for 15 minutes. After the first 15 minutes, set the oven temperature down to 350 F and bake for another 45-60 minutes. They're done when a butter knife stuck in them comes out clean.
I wish I had a magic kitchen fairy that would follow behind me and keep everything washed, dried, and put away. Maybe one day...
TA DA! Your wonderful pumpkin (or butternut squash) pie is complete. Take your pie out of the oven and let it cool on top of the stove. I like to eat pumpkin pie while it's still warm with vanilla ice cream. It's also delicious chilled with whipped cream on top. At this point I wasn't sure how it was going to taste, so...


 ...I let my uncle Shawn be the taste tester. He said the crust was very good, he liked the texture and that fact that it didn't taste too pumpkin-ie. We both decided it would be a good idea to skip the ginger next time, though.
I hope you are all now inspired to get into the kitchen and make your own homemade pumpkin pie. I promise it's worth it. After tasting this, the store bought pies from Kroger don't even compare! I hope I explained everything well. Feel free to comment with questions or suggestions about what recipe I should tackle next. Thanks for reading!


Comments
Post a Comment