Canvas Stenciling
My best friend Lauren will soon be married! As part of her wedding gift I made a personalized canvas for her with her wedding date on it. I figured out a way to cheat...
Instead of spending hours hand lettering or spending money on a stencil I made my own. I've provided the directions below. Please feel free to comment with any questions.
1. Go online and find fonts that you like. I typically stick to 2 different fonts per piece, but I will use different sizes, boldness, and italics. For this I used Snell Roundhand for the cursive and Arial for the block print. The size of the font will depend on the size of the canvas you're painting...I used 100-150. You can get more letters per page in landscape style. I also printed in light gray to save ink.
2. After printing, cut out the words as close as you can to the edges of the letters. Then play around with where you want them to go on the board. Once I was happy, I used masking tape to gently tape the words securely to the canvas.
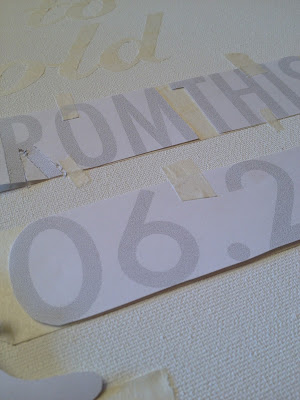 3. Next, I folded back my taped words and put strips of masking tape on my canvas wide enough for the words to fit on. It's important to overlap the strips of tape and firmly (but without ripping the canvas) press the tape down to avoid any bleeding paint. Then I folded the paper back down and secured it with a small piece of tape at the bottom.
 4. Using a box cutter and extreme patience, cut out each letter using the paper as a guide. You will be cutting through the paper and layers of tape. Do not cut the canvas! Once a word is finished, remove the paper and the excess tape. This should leave you with a perfectly placed tape stencil. This is the most time consuming step of the project. Do not get disheartened. Do not give up. Do not cut a finger off.

 5. Once all words are cut out, you're home free. Cover the entire canvas with acrylic paint. A little paint goes a long way on this project. Be sure to use light strokes to prevent paint bleeding under the tape and don't have too much paint on your brush at one time. Get into the small corners and edges of the letters and remember to paint the sides of your canvas to match.
 6. Once the paint is dry (I only waited 30 minutes...) use the box cutter to help you peel off the tape. Underneath you will find perfectly symmetrical letters and numbers making all of the time you spent cutting the stencil worth it!

Here is the finished project! This stencil method is great for people that may not have the best handwriting or can't keep things in a straight line. It helps to keep the words proportionate and, despite the time it takes to cut through all the tape, it is faster than hand painting. At least for me. Happy crafting! I hope you find this method helpful and effective.


Instead of spending hours hand lettering or spending money on a stencil I made my own. I've provided the directions below. Please feel free to comment with any questions.
1. Go online and find fonts that you like. I typically stick to 2 different fonts per piece, but I will use different sizes, boldness, and italics. For this I used Snell Roundhand for the cursive and Arial for the block print. The size of the font will depend on the size of the canvas you're painting...I used 100-150. You can get more letters per page in landscape style. I also printed in light gray to save ink.
2. After printing, cut out the words as close as you can to the edges of the letters. Then play around with where you want them to go on the board. Once I was happy, I used masking tape to gently tape the words securely to the canvas.


Here is the finished project! This stencil method is great for people that may not have the best handwriting or can't keep things in a straight line. It helps to keep the words proportionate and, despite the time it takes to cut through all the tape, it is faster than hand painting. At least for me. Happy crafting! I hope you find this method helpful and effective.


Comments
Post a Comment